This is Kaneda from Development! In this post I'm going to try to create a Docker environment using WSL2!
After all this time? Some of you may be wondering.
WSL2.........❓
Docker.........❓
Some of you may have a lot of ❓❓ in your head. First of all, I will explain from the above two terms. I hope you will also enjoy this paper.
Click here for table of contents
- 1. what is WSL?
- 2. what is Docker?
- 3. let's actually do it!
1. what is WSL?
Windows Subsystem for Linux, which has been available since Windows 10 (yes! It's this acronym that's WSL! ) refers to the mechanism for using Linux from Windows 10.
I mean, it's windows, but I can use Linux!
That's what I mean.
I'll skip the explanation about Linux this time (it's very long...).
Let's have a quick look!
2. what is Docker?
Docker is an open source software that provides an OS-level virtualization (English version) environment called a container.
Compared to hypervisor-based products that are fully virtualized, such as VMware products, it has the advantage of using less disk space, creating and launching virtual environments (instances) faster, and having almost no performance degradation.
Quote.Wikipedia.
Hmmm... I need a more engaging expression!
In other words, Docker makes it easy to build lightweight virtual machines, and the entire application, including infrastructure, can be enclosed in a box called a container. You can also distribute and version control containers.
(omitted)
[Feature]
The virtual environment is called a container type, and has less overhead because it directly accesses the host OS.
Easy to build environment, no need for Virtual Box
Containers are highly portable, so as long as you have Docker installed, you can run your app in the exact same environment.
The container is recognized as one process by the host OS.
Quote.Introduction to Docker #1 [What is Docker] - Qiita
I'm sure you are starting to understand it somewhat. Since it is a container type, it is highly portable and you can use the same development environment.
I think this is a big advantage.
The same project may behave differently in different development environments. With Docker, you don't have to worry about that!
3. let's actually do it!
Now that you've got an idea of what WSL and Docker are, let's see how you can actually use them!
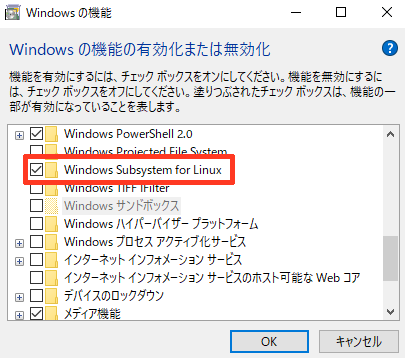
STEP1. Click "Enable or Disable Windows Features" in Control Panel.
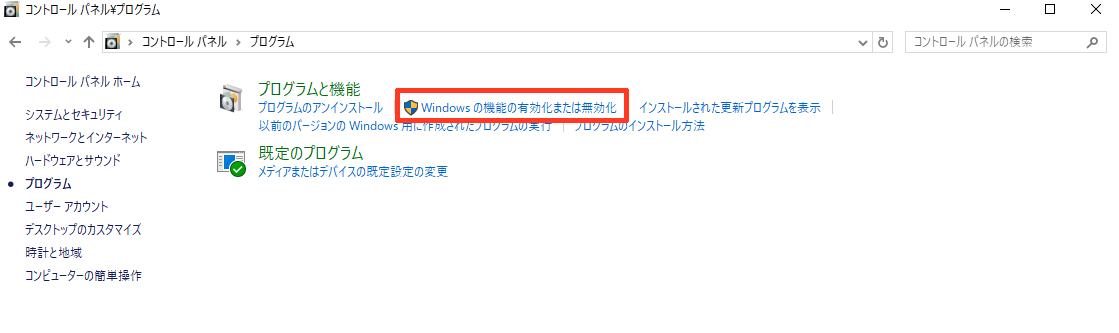
After that, confirm that the check box of "Windows Subsystem for Linux" is checked.
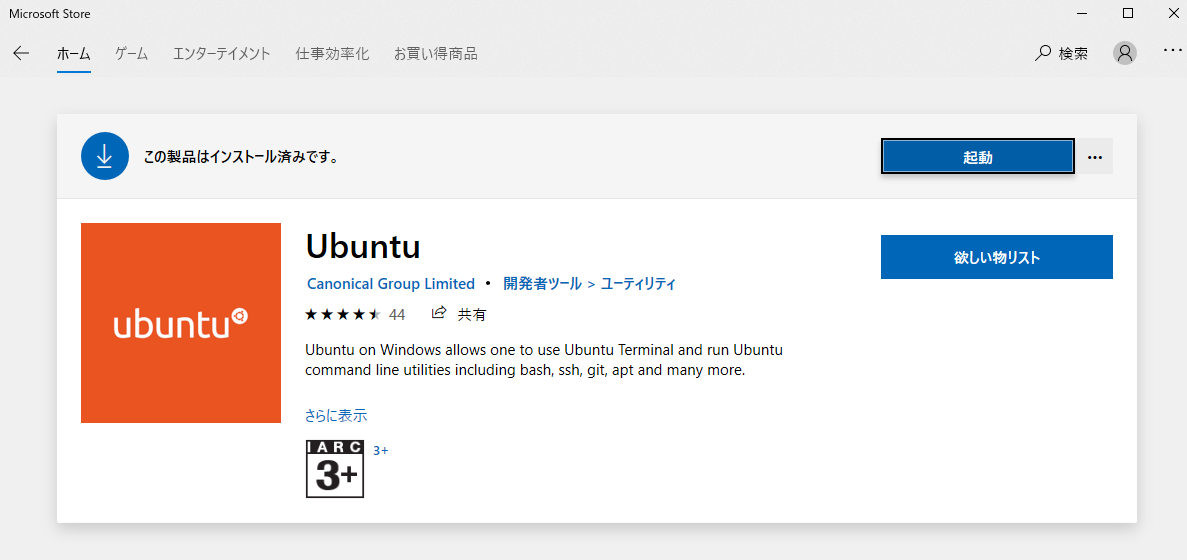
STEP2. Search for the desired distribution from Microsoft Store and install it.
Personally, I recommend debian, but for now (as of 2019-11-10) docker only works on Ubuntu installed from Store, so I'll create it on Ubuntu this time.
There's a lot of commands here, so we'll go through them all at once!
STEP3. Check if "WSL2" is enabled.
After starting powershell in administrator mode.
wsl -l -v
and execution
If you get an error, do a Windows Update to get the latest build (Win10IP).
When the number of the "VERSION" column is "2", it is OK, and when it is "1", it is OK.
wsl -set-version NAME 2
and execute (NAME is the one in the "NAME" column with "VERSION" set to "1")
STEP4. When the initial setting is completed after the start, various settings are made from the terminal of wsl that was started again by the administrator authority.
(You actually need administrator privileges for docker-related tasks, but this time we'll start with administrator privileges from the beginning.)
4-1. change visudo editor from nano to vi(vim)
If you like nano, skip this step!
sudo update-alternatives -set editor /usr/bin/vim.tiny
4-2. setting to be able to "sudo" without a password
I 'sudo' everything, including mounting filesystems, managing packages, and so on. That's fine, but it's annoying that as soon as there's a pause, it says, "Put in your password! so I'm going to set it up so that I can do it without a password.
sudo visudo
and put it at the bottom of the line.
The user name you set ALL=NOPASSWD: ALL
and finish saving.
4-3 Upgrading Installed Packages and Updating Package Information
sudo apt update;sudo apt -y upgrade
4-3. install openssh client (and other things you need) so that you can use SSH
sudo apt install -y git openssh-client wget curl
STEP5. Installing Docker
sudo apt install -y docker.io docker-compose
sudo cgroupfs-mount
sudo usermod -aG docker $USER
sudo service docker start
# Configure docker to be available for normal users
sudo chown configured user name: -R ~/.docker/*
sudo gpasswd -a $USER docker
STEP6. Now quit the terminal, and start it again, this time in normal mode
STEP7. Create the docker-compose.yml file
Description of docker-compose.yml
- create `htdocs` directory in the directory where docker-compose.yml is saved beforehand
- Please prepare various conf files and ini files by yourself.
- If you create a file in the `htdocs` directory, the same file will be created in the `/var/www/html` directory in the web container (shared folder).
- `docker-compose exec web -u ec2-user bash` to manipulate inside the web server
(Example of a LAMP environment on AmazonLinux2)
version: '3
services:
  mysql:
    image: mysql:5.7
    command:
      --sql-mode=NO_ENGINE_SUBSTITUTION
    volumes:
      - db_data:/var/lib/mysql
    restart: always
    environment:
      MYSQL_ROOT_PASSWORD: PASSWORD
  phpmyadmin:
    depends_on:
      - mysql
    image: phpmyadmin/phpmyadmin
    environment:
      PMA_HOST: mysql
    restart: always
    ports:
      - "8080:80"
  web:
    image: shizuki/amazonlinux2-php-apache
    env_file: . /files/env_file.env
    volumes:
      - . /system.conf:/etc/systemd/system.conf
      - . /httpd.conf:/etc/httpd/conf/httpd.conf
      - . /php.ini:/etc/php.ini
      - . /10-opcache.ini /etc/php.d/10-opcache.ini
      - . /xdebug.ini /etc/php.d/xdebug.ini
      - . /50-zip.ini /etc/php.d/50-zip.ini
      - . /htdocs:/var/www/html
    restart: always
    ports:
      - "80:80"
      - "443:443"
    depends_on:
      - mysql
volumes:
    db_data: {}
STEP8. Go to the directory where you saved the docker-compose.yml and run
docker-compose up -d
and execute it.
Contents created in the `/var/www/html` directory at http://localhost/ and phpmyadmin can be seen at http://localhost:8080
STEP9. Install the WSL Linkage Development Extension on VSCode, and everything else will be done inside the VSCode terminal! (Huzzah!)